Campaign Tagging#
Overview#
What is Campaign Tagging?#
NPL shares links in email newsletters, on social media, and print materials. Matomo can tell you that a user came from x.com, but it cannot tell you if the user came from a specific link posted by the library. Campaign tagging allows us to know if a link we post on X generates a visit to our site.
Campaign tags are special query parameters that are added to the end of a web address shared on an external site (social media, newsletter, etc.). They tell Matomo exactly where the user came from, overriding the browser's default referral detection.
What Can We Get from the Data?#
-
Channel Performance: See which source or medium drives the most interaction (e.g., comparing email traffic vs. organic social vs. print QR codes).
-
A/B Content Testing: Analyze what type of content layout works best. Do users click video links in an email more than standard text buttons?
-
Vanity URL & Print Tracking: Gauge the effectiveness of print media and radio spots by seeing how many users type in or scan custom shortcuts.
Parts of a Campaign URL#
Matomo recognizes both standard mtm tags and Matomo-native mtm tags. We prefer the mtm_ prefix going forward:
| Parameter | Required? | Description / Example |
|---|---|---|
| mtm_source | Required | Where the link lives. Identifies the specific source of the visitor, e.g. “salon-at-615-newsletter” or “instagram”. |
| mtm_medium | Required | How the user got to us. Identifies the broad marketing channel category (e.g., email, social, print, paid-ad). |
| mtm_campaign | Required | The marketing campaign the URL is associated with (e.g., read-to-rise or health-fair-2026). Ties all cross-channel efforts together under one project umbrella. |
| mtm_cid | Optional | Campaign ID. Used primarily to align with internal tracking codes or paid advertisement IDs. |
| mtm_content | Optional | Specific asset link. Differentiates links within the exact same campaign/source—like tracking a sidebar-banner vs. a footer-link to see which gets more clicks. Also used for adding dates. |
| mtm_keyword | Optional | Paid search terms. Used to track specific search keywords (replaces mtm_term). |
Tagging Guidelines#
- Off-Site Only: Campaign parameters should only be added to off-site links (social media, print, email) that point a user to an NPL site. Never tag internal links (links on NPL, Limitless, Catalog, Salon, Events, or other NPL websites) with campaign parameters.
- Terminology: Check the Master Tag List tab for the correct source and medium terminology.
- Case Sensitivity: Use lowercase for all parameters. Parameters are case sensitive. Tagging something with “Email-Newsletter” is not the same as tagging it “email-newsletter”. Stick to lowercase all the time for consistency.
- Spaces: Use a dash (-) to separate terms.
- Dates: Format dates as yyyy-mm-dd. Only add dates to the mtm_content field, such as adding the publication date to a newsletter link.
- Special Characters: Use a dash to separate words.
Campaign Tagging Process#
Note: Campaign tagging is for links that point to the website. Never add campaign parameters to a link that lives on the NPL site (a link in a home promo, on a basic page, etc.) or you will wreck our data.
Plan Upcoming Campaigns#
- Identify the channels to track for each campaign: newsletter, X (Twitter), Facebook, Instagram, etc.
- Identify the landing page(s) where you want to send users.
- Determine if you need shorter URL. If yes, contact Web Services.
Make Campaign URLs#
Put all tags in the Tracking Worksheet so you can double check syntax, keep track of tags from previous campaigns, and stay organized.
Remember: Never add campaign parameters to a link that lives on the NPL site (a link in a home promo, on a basic page, etc.) or you will wreck our data.
-
Open the Campaign Tracking Worksheet. If you need a new tab/sheet, make a copy of the Master Sheet and rename the new tab.
-
Use the tagging spreadsheet to create a tagged-URL (fill out columns C - L). Use one line for each channel/opportunity you’re tracking.
-
Copy and paste the automatically generated campaign URL from column L into a new browser to make sure it loads correctly.
-
Double check the list of campaign URLs as a group to make sure there are no syntax errors.
Using a QR Code#
-
Open the Campaign Tracking Worksheet.
-
Create a QR code with your tagged link.
-
Save the QR code. Name the file something so you know which link is in the QR code file.
-
Note the folder path to the QR code in column O, like this: Z > Communications > [folder name] > [folder name] > filename.jpg
-
Share the print-ready QR code file with whoever needs it.
Use the Campaign Links#
Add the campaign-tagged links to messages we’re sending out: email, twitter, etc.
-
Open the Campaign Tracking Worksheet.
-
Find your tagged link.
-
Copy/paste your links into emma, hootsuite, etc.
Get Data from Matomo Analytics#
-
Log in to Matomo Analytics.
-
Select the property where users were being sent (NPL site, Calendar, Catalog, etc.)
-
In the left-hand sidebar menu, navigate to Acquisition > Campaigns.
- Campaigns Main View: This will list traffic by the value entered in mtm_campaign (or mtm_campaign). You will see visits, unique visitors, actions (page views), bounce rates, and conversion actions.
-
Advanced View: Click on Keywords or Source/Medium sub-tabs under Acquisition to break the data down by specific platforms (mtm_source) and channels (mtm_medium).
-
Add a segment to view data for one campaign.
-
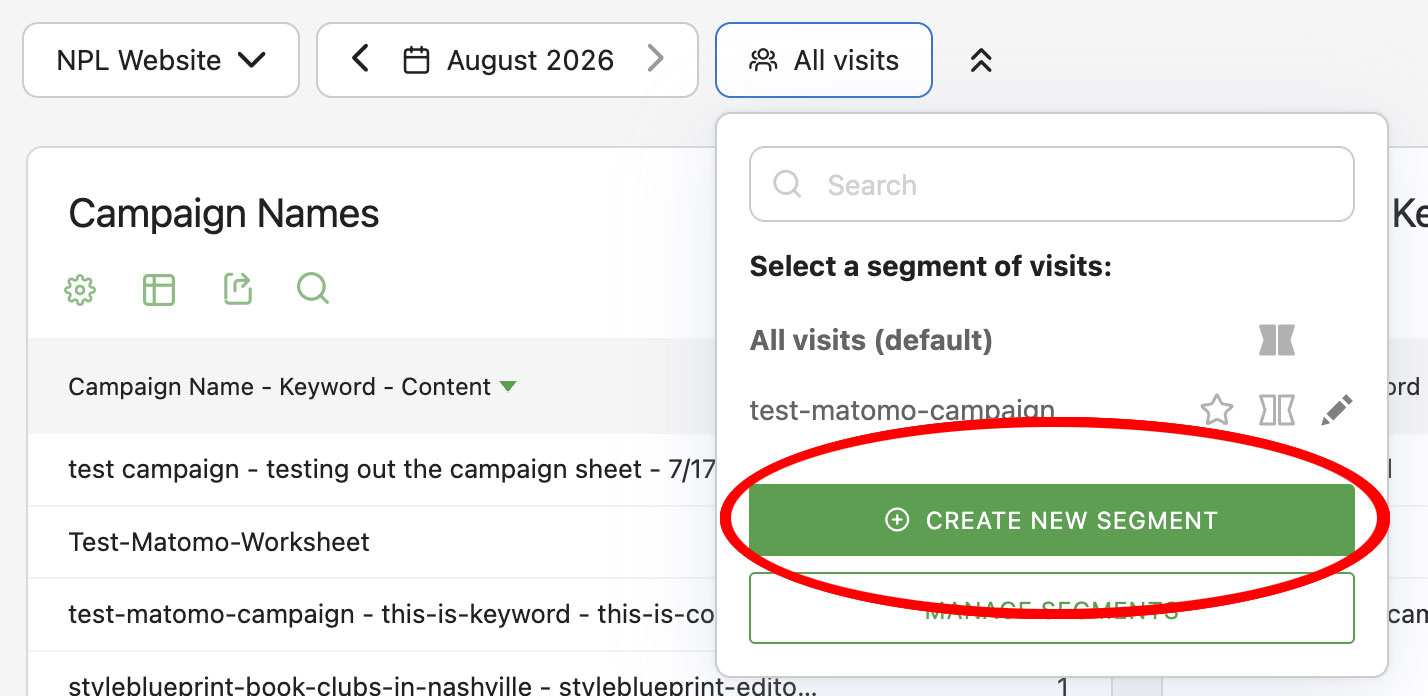
At the top of the Matomo dashboard, look for the segment selector (default is "All Visits").

-
Click the segment selector and choose "create new segment".
-
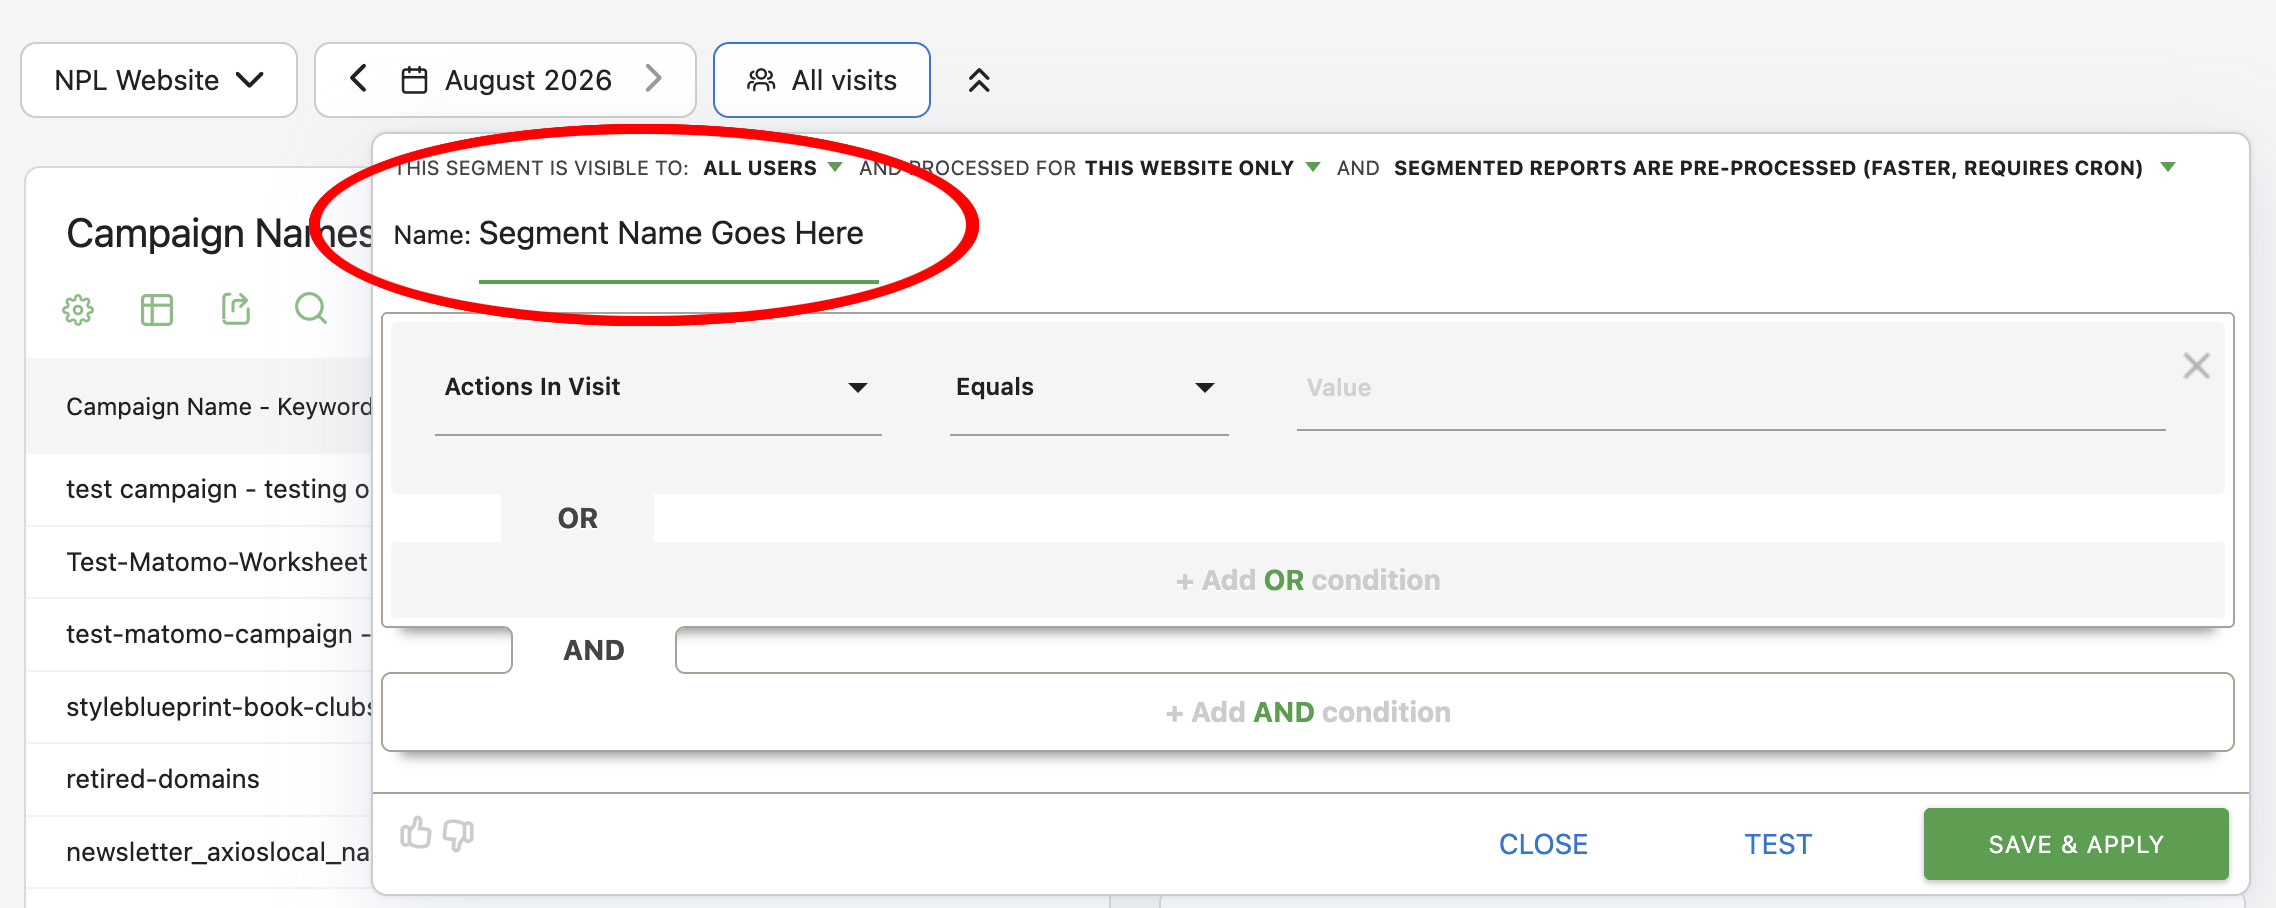
Give it a name like "test-matomo-campaign".
-
Set up your segment:
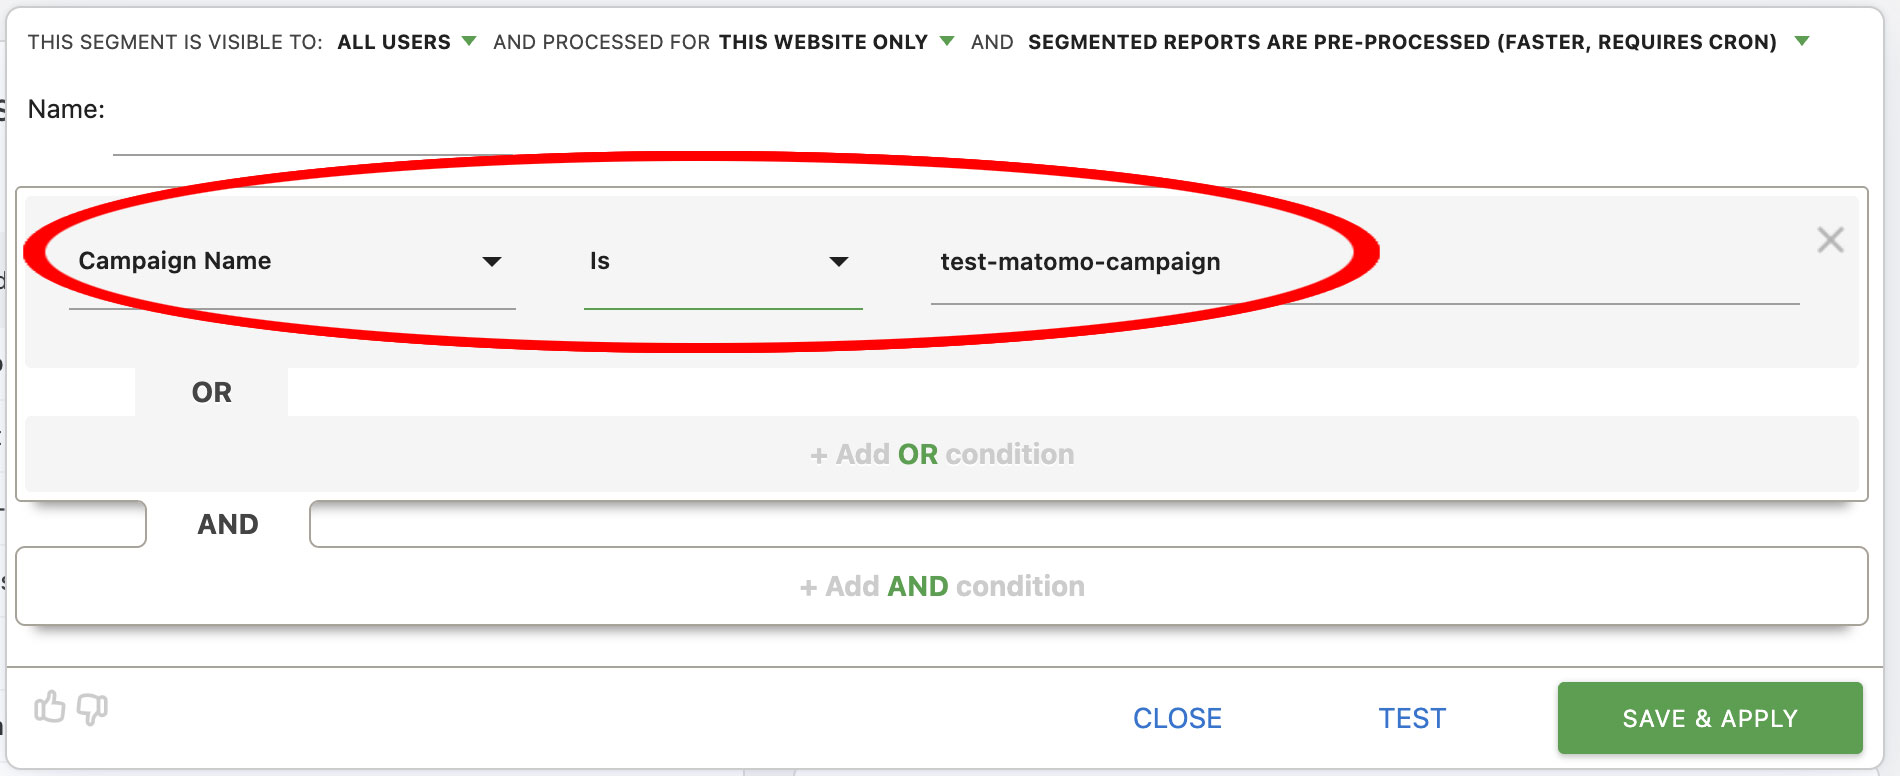
- In the "actions in visit" condition, choose Acquisition > Campaign Name.
- For the operator, select "is".
- For your value, type the name of your campaign. For example, test-matomo-campaign.
- Then "Save and Apply".
-
You should see data filtered only to the data from that one campaign. Navigate to Acquisition > Campaigns to see the Source, Medium, Keyword, and Source–Medium breakdowns only for your campaign.
- Turn the segment on and off when you need to toggle back to viewign all data.
Demonstration#
See the Campaign Tagging presentation for an overview with slides.